

그래픽 & 멀티미디어
2007.05.09 20:37:10 (*.105.125.81)
30262
gx 라이브러리가 아래와 같은 내용으로 업데이트 되었습니다.
- gx_dot()를 gx_set_pixel()로 함수 이름을 변경했습니다. 또한 아래와 같이 규칙 1에 맞추어 이름을 바꾸었습니다.
변경 전 변경 후 GXERR_VSCREEN_INFO
GXERR_FSCREEN_INFO
GXERR_MEMORY_MAPPINGGXERR_VSCREEN_INFO
GXERR_FSCREEN_INFO
GXERR_MEMORY_MAPPINGgx_dot() gx_set_pixel() gx_moveto() gx_move_to() gx_lineto() gx_line_to() - 칼라 값을 위한 color_t 스트럭쳐를 추가했습니다.
- 좌표에 대한 칼라 값을 구하기 위한 gx_get_pixel()을 추가했습니다.
- dc 의 pen과 brush의 칼라를 지정하는 gx_pen_color()와 gx_brush_color()를 추가했습니다.
gx 라이브러리 규칙 1 - 이름 짓기
gx 라이브러리를 보면 접두사로 gx_를 붙였습니다. 이후에는 단어와 단어 사이에는 언더바를 추가하도록 하겠습니다. 혹시 헝가리 탑의 변수나 함수 이름을 좋아 하시는 분들 께서는 함수 포인터의 이름을 변경하시거나 추가하시면 됩니다.
아래와 같이 말이죠....^^
int   gx_color( dc_t *dc, int red, int green, int blue)
{
   return dc->color( red, green, blue);
}
int   gxColor( dc_t *dc, int red, int green, int blue)
{
   return dc->color( red, green, blue);
}
gx_get_ pixel()
gx_get_pixel()은 역시 함수 포인터로 각 칼라 깊이에 따라 만들어진 함수를 호출하게 됩니다.
void  gx_get_pixel( dc_t *dc, int coor_x, int coor_y, color_t *color)
{
   dc->get_pixel( dc, coor_x, coor_y, color);
}
dc의 함수 포인터에는 역시 칼라 깊이에 맞춘 함수가 대입되어 있습니다. 예를 들어 16bit 칼라에 대해서는 아래와 같습니다. 칼라의 red, green, blue 값을 255 bit 에 비례랗여 color_t 로 구하는 함수입니다.
void  gx16_get_pixel( dc_t *dc, int coor_x, int coor_y, color_t *color)
{
   unsigned short *ptr;
   unsigned short  clr_bit;

   if ( 0 > coor_x || dc->width  <= coor_x)     return;
   if ( 0 > coor_y || dc->height <= coor_y)     return;

   ptr            = (unsigned short *)dc->mapped +dc->width * coor_y + coor_x;
   clr_bit        = *ptr;

   color->blue    =  ( clr_bit & 0x1f) << 3; clr_bit >>= 5;
   color->green   =  ( clr_bit & 0x3f) << 2; clr_bit >>= 6;
   color->red     =  ( clr_bit & 0x1f) << 3;
}
지역 복사
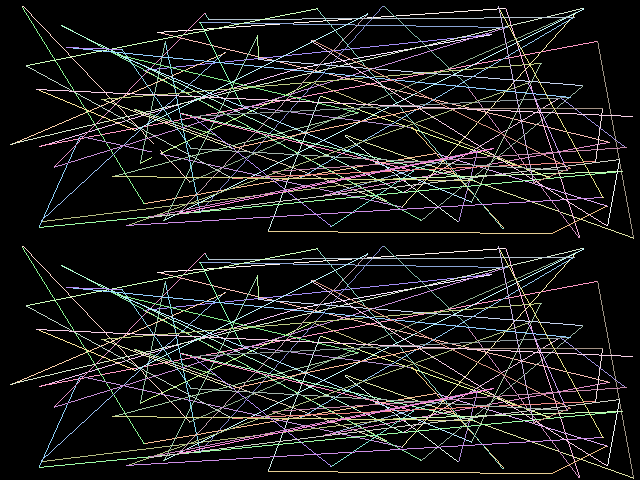
아래와 같이 gx_get_pixel()과 gx_set_pixel()을 이용하여 지격을 복사할 수 있습니다. 아래의 예는 화면 위 절반을 하면 아래 절반의 영역에 복사하는 예제입니다.
for ( jdx = 0; jdx < hgt_half; jdx++)
{
   for (ndx = 0; ndx < dc->width; ndx++)
   {
      gx_get_pixel( dc, ndx, jdx, &clr_sour);
      clr_dest = gx_color( dc, clr_sour.red, clr_sour.green, clr_sour.blue);
      gx_set_pixel( dc, ndx, jdx+hgt_half, clr_dest);
   }
}
샘플에 대해 간단히 설명을 드리면
wid_half = dc->width  / 2;
hgt_half = dc->height /2;
gx_clear( dc, gx_color( dc, 0, 0, 0));

// 화면 중 위쪽 반(半)에 난수를 이용한 직선을 그립니다.

gx_move_to( dc, rand() % wid_half, rand() % hgt_half);
for ( ndx= 0; ndx < 100; ndx++)
{
   gx_pen_color( dc, gx_color( dc, rand() %128 +128, rand() %128 +128, rand() %128 +128));
   gx_line_to( dc, rand() % dc->width, rand() % hgt_half);
}

// 화면 중 위쪽 반(半)을 화면 아래 반에 복사를 합니다.

for ( jdx = 0; jdx < hgt_half; jdx++)
{
   for (ndx = 0; ndx < dc->width; ndx++)
   {
      gx_get_pixel( dc, ndx, jdx, &clr_sour);
      clr_dest = gx_color( dc, clr_sour.red, clr_sour.green, clr_sour.blue);
      gx_set_pixel( dc, ndx, jdx+hgt_half, clr_dest);
   }
}
샘플 파일을 실행하면 아래와 같이 화면에 출력됩니다.
태그: *그래픽 *라이브러리 *그래픽라이브러리

열심히 따라하고 있는데요
color_t의 구조체가 어떻게 되어 있는지 모르곘네요.
소스를 올려놓으셨을듯한데 잘못찾겟네요 ㅠ.ㅠ