강좌 & 팁
글 수 2,412
- 다각형 그리기
→ 자바에서는 여러 개의 변으로 구성된 다각형은 연속된 점으로 정의되어, 각 점을 연결하는 직선들로 구성된다.
→ java.awt 패키지 내의 Polygon 클래스는 다각형을 그릴 때 사용한다.
→ Graphics 클래스 내의 다각형 그리기 메소드
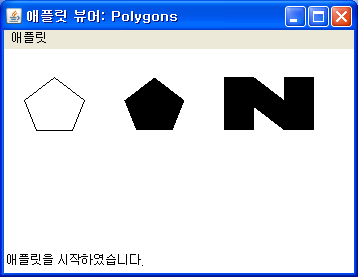
→ 예제
// 세 개의 다각형을 그리는 프로그램
import java.applet.Applet;
import java.awt.*;
public class Polygons extends Applet
{
private int[] xArray1 = {20, 50, 80, 68, 32};
private int[] yArray1 = {50, 27, 50, 80, 80};
private int[] xArray2 = {120, 150, 180, 168, 132};
private int[] yArray2 = {50, 27, 50, 80, 80};
private Polygon aPolygon = new Polygon();
public void paint(Graphics g)
{
g.drawPolygon(xArray1, yArray1, 5);
g.fillPolygon(xArray2, yArray2, 5);
aPolygon.addPoint(220, 27);
aPolygon.addPoint(220, 80);
aPolygon.addPoint(250, 80);
aPolygon.addPoint(250, 57);
aPolygon.addPoint(280, 80);
aPolygon.addPoint(310, 80);
aPolygon.addPoint(310, 27);
aPolygon.addPoint(280, 27);
aPolygon.addPoint(280, 50);
aPolygon.addPoint(250, 27);
g.fillPolygon(aPolygon);
}
}
→ 실행 결과import java.applet.Applet;
import java.awt.*;
public class Polygons extends Applet
{
private int[] xArray1 = {20, 50, 80, 68, 32};
private int[] yArray1 = {50, 27, 50, 80, 80};
private int[] xArray2 = {120, 150, 180, 168, 132};
private int[] yArray2 = {50, 27, 50, 80, 80};
private Polygon aPolygon = new Polygon();
public void paint(Graphics g)
{
g.drawPolygon(xArray1, yArray1, 5);
g.fillPolygon(xArray2, yArray2, 5);
aPolygon.addPoint(220, 27);
aPolygon.addPoint(220, 80);
aPolygon.addPoint(250, 80);
aPolygon.addPoint(250, 57);
aPolygon.addPoint(280, 80);
aPolygon.addPoint(310, 80);
aPolygon.addPoint(310, 27);
aPolygon.addPoint(280, 27);
aPolygon.addPoint(280, 50);
aPolygon.addPoint(250, 27);
g.fillPolygon(aPolygon);
}
}

- 열린 다각형
→ 열린 다각형에서는 마지막 점과 시작점이 연결되지 않는다.
→ 열린 다각형은 다음의 메소드를 사용하여 그린다.
→ void drawPolyline(int[] xPoints, int[] yPoints, int numOfPoints)
→ 인수 xPoints와 yPoints는 열린 다각형을 구성하는 점들은 x와 y의 좌표를 저장하는 배열이고, numOfPoint는 점의 개수.
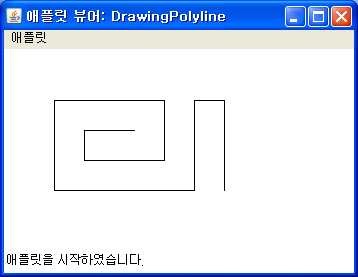
→ 예제
// 열린 다각형을 그리는 프로그램
import java.applet.Applet;
import java.awt.*;
public class DrawingPolyline extends Applet
{
private int[] xArray = {130, 80, 80, 160, 160, 50, 50, 190, 190, 220, 220};
private int[] yArray = {80, 80, 110, 110, 50, 50, 140, 140, 50, 50, 140};
public void paint (Graphics g)
{
g.drawPolyline (xArray, yArray, 11);
}
}
→ 실행결과import java.applet.Applet;
import java.awt.*;
public class DrawingPolyline extends Applet
{
private int[] xArray = {130, 80, 80, 160, 160, 50, 50, 190, 190, 220, 220};
private int[] yArray = {80, 80, 110, 110, 50, 50, 140, 140, 50, 50, 140};
public void paint (Graphics g)
{
g.drawPolyline (xArray, yArray, 11);
}
}

- 영역 복사와 삭제
→ copyArea() 메소드
-> 화면의 특정 영역을 복사하여 다른 위치로 옮긴다.
-> void copyArea(int x, int y, int width, int height, int dx, int dy);
-> 점 (x, y)로부터 폭(width), 높이(height)의 직사각형에 해당하는 영역을 점(x, y)로부터 수평거리 dx, 수직거리 dy 만큼 떨어진 위치로 이동시킨다.
→ clearRect() 메소드
-> 화면의 특정영역을 지운다.
-> void clearRect(int x, int y, int width, int height)
-> 인수로 넘겨받은 직사각형 영역을 배경색으로 칠하여 지운다.
-> 애플릿 윈도우의 전체를 지울 때는 size() 메소드를 이용하여 지울 수 있다.
-> g.clearRect(0, 0, size().width, size().height);
-> size() 메소드는 Dimenstion 객체를 반환한다.
→ 예제
// 화면의 특정영역을 복사하고 지우는 프로그램
import java.applet.Applet;
import java.awt.Graphics;
public class CopyRectangle extends Applet
{
public void paint(Graphics g)
{
g.drawRect(35, 20, 60, 60);
g.copyArea(35, 20, 35, 35, 90, 0);
g.fillRect(210, 20, 160, 60);
g.clearRect(230, 50, 120, 20);
setSize(410, 100);
}
}
→ 실행 결과import java.applet.Applet;
import java.awt.Graphics;
public class CopyRectangle extends Applet
{
public void paint(Graphics g)
{
g.drawRect(35, 20, 60, 60);
g.copyArea(35, 20, 35, 35, 90, 0);
g.fillRect(210, 20, 160, 60);
g.clearRect(230, 50, 120, 20);
setSize(410, 100);
}
}

- 윈도우의 생성과 이벤트 처리
윈도우 생성
→ 어플리케이션 프로그램의 윈도우의 생성
→ 윈도우의 구성 요소들은 java.awt 패키지에 클래스로 정의되어 있다.
→ awt는 Abstract Windowing Toolkit의 약어로, awt 패키지 내에는 윈도우를 다루는 여러 도구들이 클래스로 정의되어 있다.
→ 사용자 인터페이스를 위한 윈도우는 Frame 클래스의 객체로 생성된다.
→ Frame 클래스는 Window 클래스의 서브 클래스로 타이틀바(title bar)를 가지고 있고, 크기가 조절되는 윈도우의 클래스이다.
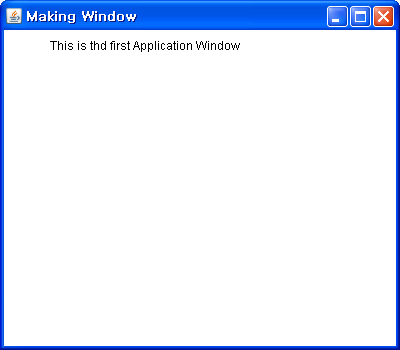
→ 예제
// Frame 클래스로부터 윈도우를 생성하는 프로그램
import java.awt.*;
import java.awt.event.*;
// main 함수가 이벤트(메시지)를 들어야 한다.
// 예전의 텍스트 기반의 엔터가 입력되는 시점에 동작하는 것이 아니라(명령의 시작과 끝이 명확)
// 이벤트를 기반으로 한다.(명령의 시작과 끝이 명확하지 않기 때문이다.)
// 다중상속이 되지 않으므로 틀은 상속(extends Frame)받고
// 이벤트를 처리할 수 있는 객체를 내부적으로 만든다.(구성)
public class MakingWindow extends Frame
{
public MakingWindow()
{
// 생성자 - 여기서는 창의 내용
super("Making Window");
}
// dos는 그래픽 객체가 없어서 창을 띄울수 없으나
// Java는 그래픽 객체를 만들 수 있다.
public static void main(String[] args)
{
// 자신의 객체를 생성 - 어플리케이션 객체
MakingWindow w = new MakingWindow();
// 상속을 받지 않고 구성으로 사용(객체에 다른 객체를 붙인다.)
// 윈도우 상단의 닫기 박스를 클릭했을 때 윈도우를 닫는 기능.
w.addWindowListener (new WindowHandler());
// 가로, 세로 크기
w.setBounds(150, 130, 400, 350);
// 화면 출력(true), 화면 삭제(false)
w.setVisible(true);
}
// 윈도우의 WM_PAINT()와 유사
public void paint(Graphics g)
{
// 윈도우에 문자열을 출력시키는 메소드
g.drawString("This is thd first Application Window", 50, 50);
}
}
class WindowHandler extends WindowAdapter
{
// 윈도우의 WM_DESTROY()와 유사
public void windowClosing(WindowEvent e)
{
System.exit(0);
}
}
→ 실행 결과

- Component 클래스
→ Dos와 윈도우의 가장 큰 차이는 입력이 바뀐다는 것이다.
-> Dos 환경에서는 키보드 입력 밖에 없었지만
-> 윈도우로 넘어오면서 이벤트(메시지)로 바뀌었다.
→ Component 클래스는 추상클래스로 객체를 생성할 수 없지만, 서브클래스에서 필요한 속성을 정의해 준다.
→ Component의 서브 클래스들은 컨트롤(control)이라 부르며(container 제외), 사용자는 이 클래스의 객체를 이용하여 프로그램에게 수행할 작업을 지시한다.
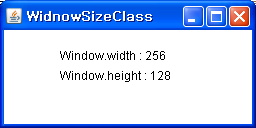
→ 예제
/* 사용자 윈도우를 생성하고, Toolkit 객체를 이용하여 화면의 크기를 알아내어 윈도우를 설정하는 프
로그램 */
import java.awt.*;
import java.awt.event.*;
public class WindowSizeClass extends Frame
{
static int theWidth;
static int theHeight;
public WindowSizeClass()
{
super("WidnowSizeClass");
}
public static void main(String[] args)
{
WindowSizeClass aWindow = new WindowSizeClass();
// WindowHandler 클래스와 함께 윈도우를 닫기 위해서 작성
aWindow.addWindowListener (new WindowHandler());
// Frame 객체인 aWindow로부터 getTookit() 메소드를 호출하여 얻는다.
// Window 클래스로 부터 상속받은 메소드
// Toolkit 클래스는 추상 클래스로 java.awt의 클래스들을 프로그램 실행환경에 연결
Toolkit aToolkit = aWindow.getToolkit();
// getScreenSize()는 Toolkit 클래스의 멤버로 Dimension 객체를 돌려준다.
// Dimension 내의 멤버 width와 height는 화면과 폭의 넓이를 픽셀 개수로 돌려준다.
Dimension sizeOfWindow = aToolkit.getScreenSize();
int x = sizeOfWindow.width / 4;
int y = sizeOfWindow.height / 4;
theWidth = sizeOfWindow.width / 4;
theHeight = sizeOfWindow.height / 6;
aWindow.setBounds(x, y, theWidth, theHeight);
aWindow.show();
}
public void paint(Graphics g)
{
g.drawString("Window.width : " + theWidth, 60, 60);
g.drawString("Window.height : " + theHeight, 60, 80);
}
}
class WindowHandler extends WindowAdapter
{
public void widnowClosing(WindowEvent e)
{
System.exit(0);
}
}
→ 실행 결과


